DIY Spring Lemon Grapevine Wreath


DIY Spring Lemon Grapevine Wreath
Welcome Friends & Family this Spring with this cheerful Spring Lemon Grapevine Wreath! Using the supplies and steps listed below you can make your very own gorgeous wreath. This wreath can be used Spring & Summer and is perfect for any area of your home. You can create this wreath using any combination of flowers and ribbon that you have available or that you prefer.
Supplies needed:
- (1) Round Grapevine Wreath
- (1) 20" Spring Sunflower & Hydrangea Floral Bush
- (1) 28" English Ivy
- (2) Lemon Slice Sprays
- (1) 2.75" Lemons & Blue Farm Truck Spring Ribbon
- (1) 1.5" Royal Blue Spring Lemons Ribbon
- Wire Cutters
- Hot Glue
- Scissors
- Floral Wire
- To begin, gather your supplies. Remember, you can use any combination of ribbon and flowers. We have a greenery bush, a flower bush, 2 accent stems and 2 bolts of ribbon to use in this wreath today.

- Start by cutting the stems off of your greenery bush. You will want to place these on the left side of the wreath in a crescent shape going aroudn the wreath. Remember to add a dollop of hot glue to the end of each of your stems before placing it in the Grapevine. You may need to hold each stem for just a second while the glue dries to the wreath.


- You are creating a base layer of greenery during these steps that will be the background for your flowers.

- Next you will begin cutting the flower bush apart. You will need each stem to be separated from the original bush.

- Then you will start arranging the flowers on top of the greenery. You can place the flowers in any spot that you want. Just remember to add a dollop of hot glue to the end of each stem before placing it in the Grapevine. You may also need to hold the stem for a second while the glue dries.
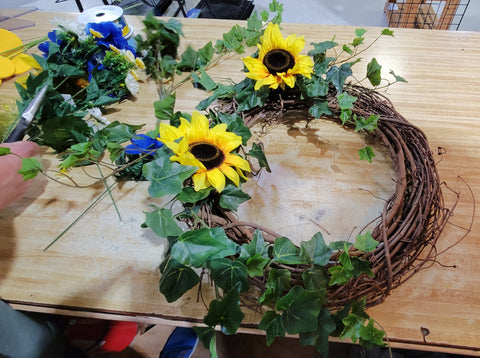
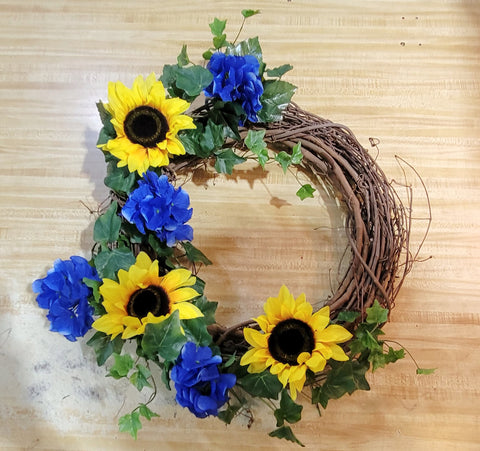
- You will continue adding flowers until most of them have been used. You may need to trim the stem if the stems are too long and the flowers stick out too far away from the greenery.
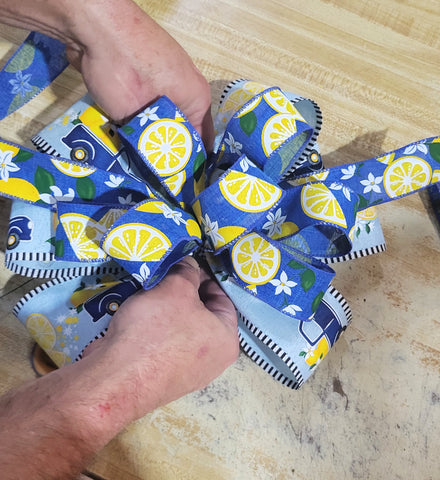
- Once you are happy with the amount of flowers on the wreath you will tie your bows. You will start with the 2.5" Ribbon and tie a three loop bow. This means that there will be three loops of ribbon on each side of the bow. You will use one piece of the Floral Wire to secure the bow in the middle and then twist the wire together underneath the bow. We have a complete Bow Tying Tutorial on our YouTube channel if you need a little help tying bows. You can find the video here

- Next you will want to tie another bow using the 1.5" ribbon. This bow will need to be slightly smaller in diameter because we are going to stack the smaller bow ontop of the 2.5" bow.

- Next you will set the 1.5" ribbon bow on top of the 2.5" ribbon bow and twist the two pieces of floral wire together to secure the final bow.
- Your final bow is now ready to be attached to the wreath. You can place the bow on the wreath in roughly the bottom left corner of the wreath. You will need to use the floral wire to secure the bow to the wreath by twisting the wire around the grapevine branches. You can feed the wire through the branches to the backside and then twist them together.

- Once your bow has been added you can adjust and fluff the bow by pulling on the loops and arranging them until you are happy with the final placement. You can also take this time to step back from your wreath and see if there are any holes or areas where you might want to add a bit more greenery or flowers.

- Finally we will add the Lemon Slices spray or any other accent floral spray that you have chosen. You will want to cut the longer part of the stem off of the spray, leaving you with just the decorative part. These do not need to be cut into individual pieces.

- You will then add your Lemon Slices spray by nesting them under and in between some of the flowers on either end of your crescent shape. Remember to add a dollop of hot glue to the end of each stem and hold them for a few seconds inside the grapevine.

You will now have a lovely completed Wreath that you can enjoy for many months! We hope that you have enjoyed this tutorial and will visit our site again for more to come!
- Rebecca Coffman